One thing I’ve loved about being part of the Point of View this year is that sometimes gives me the push to complete projects that have hung out on my to-do list for too long. Like a year.
I read some blogs where the (amazing) author is able to pound out a whole bedroom makeover in a weekend. I honestly don’t know how they do it! Mostly I’m lucky if I can get a picture frame painted, or a fabric flower made in a day.
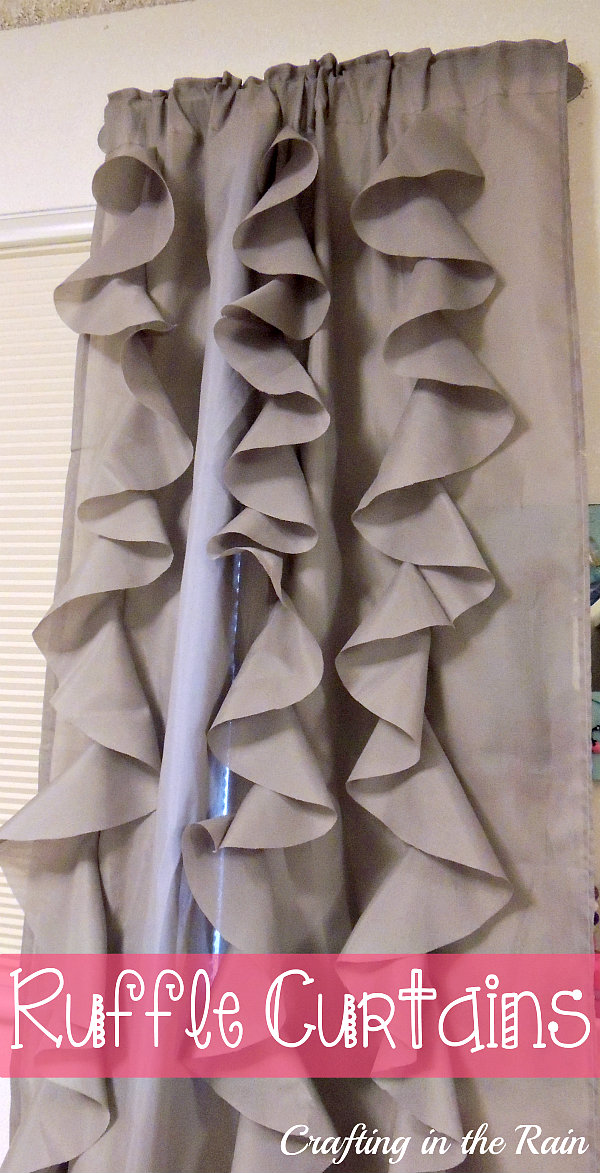
But anyway, I’ve had this idea for ruffled curtains for my girls’ room for a quite a while now, and knew that I wanted to do vertical ruffles, instead of horizontal ones. I found a couple of different tutorials but they didn’t quite have the look I was going for.
Then I learned about circle ruffles in the post about a ruffled shower curtain at the Rooster and the Hen. And tucked the idea away for later. More recently I saw this post with short curtain rods by House of Hepworths and decided that “skinny” curtains would be perfect for their window since there are already blinds there and the little window seat underneath.
So finally armed with all my ideas I went to Ikea and bought 2 bygel rods and 1 package of vivan curtains (it had two panels in it) I actually looked for sheets first, but didn’t find any colors or patterns that I loved for the right price. The curtains were $10 and the 21 inch rails were 2.99 each.


After ironing, I cut 1 panel in half (top to bottom direction) and folded back the “casing” at the top of the curtain so there would still be hole for the rod to go through, and hemmed the cut side.

Then I hemmed the bottoms to be the right length for when they were hung)
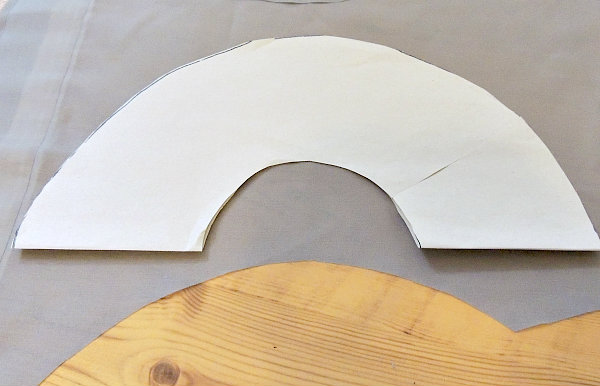
I made my circle pattern and started cutting circles out from the other curtain panel.
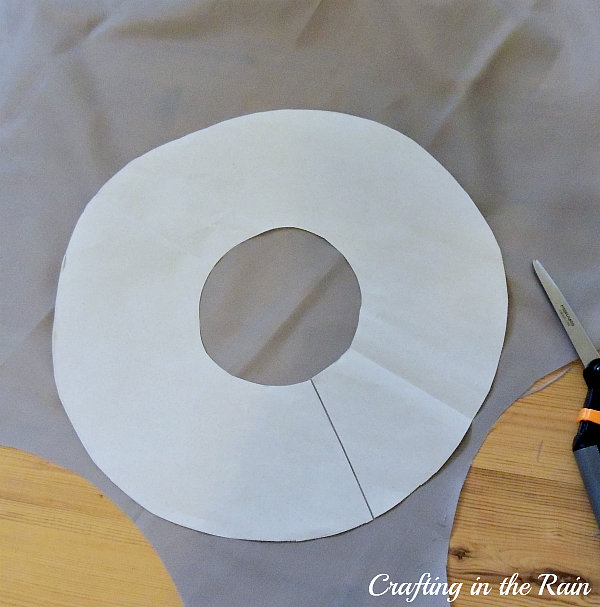
The diameter of my outer circle is 14 inches, and the diameter of the inner circle is 4 inches, so that makes the width of the actual ruffle about 5 inches. I got lucky and just barely had enough fabric to make all my strips. (in some places I was only able to cut a half-circle)
If you were going to recreate this exactly, I’d say to buy another package of curtains to make sure you have plenty.
(You could also do just 2 strips of ruffles down each curtain instead of 3 like I did, then you’d have enough)
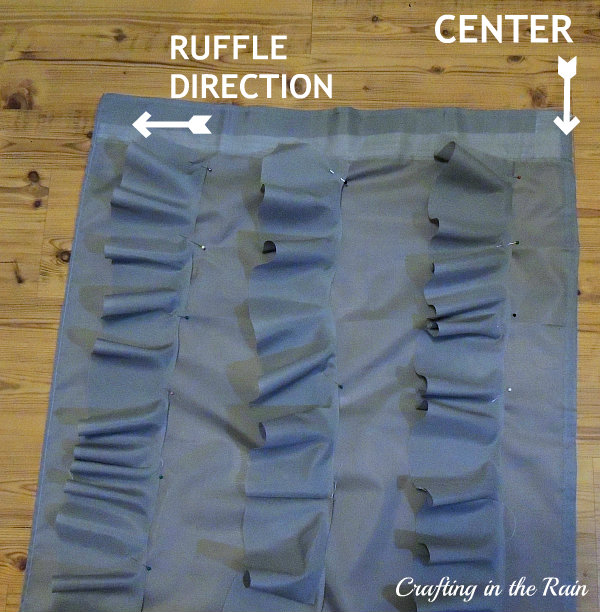
Here’s how you build the ruffles: After circles are cut and inner circle has also been cut, start sewing end to end. I ended up needing 6 for 1 strip of ruffles down my curtain. Pin ruffle strips down the curtain and sew in place. I placed my ruffles so the “faced away” from the center. This is the curtain for the left side of the window. The curtain for the right side will have ruffles going the other direction:
Slide rod through the loop at the top of the curtain and then attach the rods to the wall–that’s one tricky thing about these since they’re not *really* curtain rods…once they’re installed, you can’t take the curtains back off without removing all the hardware.

I’d love to hear what you think? Did I accomplish my goal of having fun ruffle-y curtains without them being “too much” for the room?
Be sure to visit the Point of View link party as well, to share or get more ideas for what to do with Windows!

Dawn Sorensen
Monday 19th of March 2018
Perfect! I think I searched the whole internet before finally finding you. I'm redoing my room inspired by one in Good Housekeeping, and of course they give no how to to's.
Stephanie
Wednesday 21st of March 2018
So glad it's helpful! Hope you'll share a picture of your new curtains!
Wanda Wilkins
Sunday 15th of November 2015
I would run a zig zag stitch on fraying materials and you could always use polyester because it doesn't fray much...very cute........got me thinking